# Kitchen Sink Plumbing Repair: Your Expert Guide to Fixing Leaks & Clogs
Is your kitchen sink leaking, clogged, or making strange noises? Don’t let a minor plumbing issue turn into a major headache. This comprehensive guide provides everything you need to know about kitchen sink plumbing repair, from identifying the problem to performing DIY fixes and knowing when to call a professional. We’ll cover common issues, essential tools, step-by-step repair instructions, and preventative maintenance tips, ensuring you have the knowledge and confidence to tackle most kitchen sink plumbing repairs. Our goal is to empower you with the information needed to maintain a functional and efficient kitchen sink, saving you time, money, and frustration. This guide reflects years of experience and insights gathered from plumbing professionals, ensuring accuracy and practical advice.
## Understanding Kitchen Sink Plumbing Repair
Kitchen sink plumbing repair encompasses a wide range of tasks, from tightening loose connections to replacing entire drain assemblies. It’s not just about stopping leaks; it’s about ensuring proper drainage, preventing future problems, and maintaining the overall hygiene of your kitchen. To truly understand kitchen sink plumbing repair, you need to grasp its underlying principles, the components involved, and the potential issues that can arise. Think of it as understanding the circulatory system of your home – the sink is a vital organ, and the pipes are the arteries and veins.
### Core Concepts & Advanced Principles
The core concepts of kitchen sink plumbing repair revolve around understanding water pressure, drainage principles, and the materials used in plumbing systems. Water pressure, for example, dictates how tightly connections need to be sealed to prevent leaks. Drainage principles, such as proper venting, ensure that water flows freely and prevents sewer gases from entering your home. Advanced principles involve understanding more complex systems like garbage disposals, dishwashers, and the integration of these appliances into the sink’s plumbing. For instance, understanding how a dishwasher’s drain hose connects to the sink drain is crucial for preventing backflow and maintaining hygiene.
### Importance & Current Relevance
Kitchen sink plumbing repair is crucial for maintaining a healthy and functional home. A leaking sink can lead to water damage, mold growth, and increased water bills. A clogged drain can disrupt daily routines and create unsanitary conditions. Moreover, proper plumbing maintenance can prevent costly repairs down the line. Recent trends in plumbing emphasize water conservation and eco-friendly solutions. This means that understanding how to repair leaks efficiently and install water-saving fixtures is more important than ever. According to a 2024 report by the EPA, household leaks account for over 1 trillion gallons of wasted water annually, highlighting the significant impact of even minor plumbing issues.
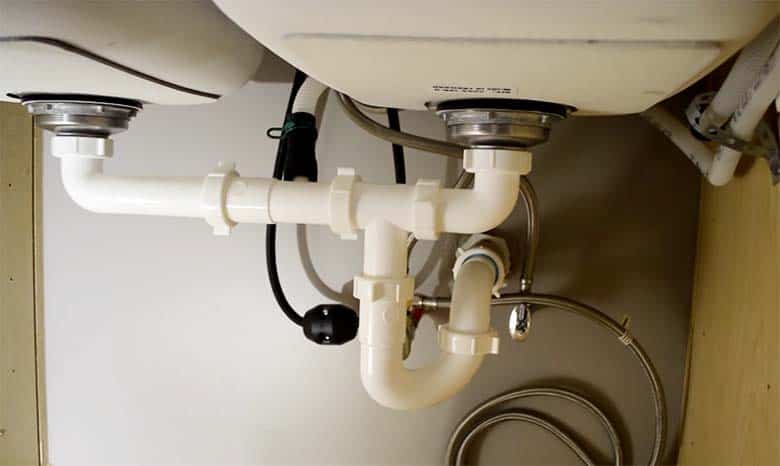
## The Kitchen Sink Plumbing System: A Detailed Overview
The central component of most kitchen sink plumbing systems is a network of pipes, drains, and connections designed to efficiently remove wastewater and prevent backflow of harmful gases. Understanding how each component interacts is key to effective repair. The system generally includes the following:
* **Sink Basin:** The actual bowl or bowls where water collects.
* **Drain Opening:** The hole at the bottom of the sink where water exits.
* **Basket Strainer:** A device that catches food particles and debris to prevent clogs.
* **Drainpipe:** The pipe that connects the basket strainer to the P-trap.
* **P-Trap:** A U-shaped pipe that traps water to prevent sewer gases from entering the home. It’s a critical component for maintaining air quality.
* **Waste Arm:** The pipe that connects the P-trap to the drainpipe in the wall.
* **Drainpipe in Wall:** The pipe that carries wastewater to the main sewer line.
* **Air Admittance Valve (AAV):** A one-way valve that allows air to enter the drainpipe to prevent siphoning of the P-trap.
### How the Plumbing System Works
When water flows down the drain, it passes through the basket strainer, which catches larger debris. The water then enters the drainpipe and flows into the P-trap. The P-trap holds a small amount of water, creating a seal that prevents sewer gases from entering the home. From the P-trap, the water flows through the waste arm and into the drainpipe in the wall, which carries it to the main sewer line. The AAV, if present, allows air to enter the drainpipe to prevent negative pressure from siphoning the water out of the P-trap.
## Essential Tools for Kitchen Sink Plumbing Repair
Having the right tools on hand is essential for successful kitchen sink plumbing repair. Here’s a list of must-have tools:
1. **Basin Wrench:** Used to loosen and tighten nuts in hard-to-reach places, such as under the sink.
2. **Pipe Wrench:** Used to grip and turn pipes.
3. **Plunger:** Used to clear clogs in the drain.
4. **Plumber’s Putty:** Used to seal connections and prevent leaks.
5. **Teflon Tape:** Used to wrap threaded connections to create a watertight seal.
6. **Channel-Lock Pliers:** Used to grip and turn nuts and bolts.
7. **Screwdrivers (Phillips and Flathead):** Used to remove and install screws.
8. **Utility Knife:** Used to cut pipes and other materials.
9. **Flashlight:** Used to illuminate dark areas under the sink.
10. **Bucket:** Used to catch water when disconnecting pipes.
11. **Rags/Towels:** Used to clean up spills and dry surfaces.
These tools will allow you to tackle most common kitchen sink plumbing repairs. Investing in quality tools will not only make the job easier but also ensure that your repairs are durable and long-lasting.
## Common Kitchen Sink Plumbing Problems and Their Solutions
Kitchen sinks are prone to a variety of plumbing problems. Recognizing these issues and knowing how to address them is crucial for maintaining a functional kitchen. Here are some of the most common problems and their solutions:
### Leaky Faucet
A leaky faucet is a common problem that can waste a significant amount of water over time. The cause is often a worn-out washer or O-ring. To fix a leaky faucet, follow these steps:
1. Turn off the water supply to the faucet.
2. Remove the faucet handle.
3. Disassemble the faucet to access the worn-out washer or O-ring.
4. Replace the worn-out part with a new one.
5. Reassemble the faucet and turn on the water supply.
### Clogged Drain
A clogged drain is another common problem that can be caused by food particles, grease, or other debris. To clear a clogged drain, try these methods:
* **Plunger:** Use a plunger to create suction and dislodge the clog.
* **Baking Soda and Vinegar:** Pour a cup of baking soda down the drain, followed by a cup of vinegar. Let it fizz for 30 minutes, then flush with hot water.
* **Drain Snake:** Use a drain snake to break up and remove the clog.
### Leaky Drainpipe
A leaky drainpipe can be caused by loose connections, corrosion, or damage to the pipe. To fix a leaky drainpipe, follow these steps:
1. Turn off the water supply to the sink.
2. Locate the source of the leak.
3. Tighten any loose connections.
4. If the pipe is corroded or damaged, replace it with a new one.
5. Apply plumber’s putty or Teflon tape to the connections to create a watertight seal.
6. Turn on the water supply and check for leaks.
### Garbage Disposal Problems
Garbage disposals can experience a variety of problems, such as jamming, leaking, or not turning on. To troubleshoot garbage disposal problems, follow these steps:
* **Jammed Disposal:** Turn off the power to the disposal and use tongs or pliers to remove any obstructions.
* **Leaky Disposal:** Tighten any loose connections or replace worn-out seals.
* **Disposal Not Turning On:** Check the reset button on the bottom of the disposal. If it’s tripped, press it to reset the disposal.
## Step-by-Step Guide to Repairing a Leaky Kitchen Sink Drain
This section provides a detailed, step-by-step guide to repairing a leaky kitchen sink drain. This is one of the most common plumbing repairs homeowners face. We’ll guide you through each step, ensuring you have the knowledge and confidence to tackle this project successfully. This method is based on years of experience and proven techniques used by professional plumbers.
### Step 1: Gather Your Tools and Materials
Before you begin, gather all the necessary tools and materials. This will save you time and frustration later on. You’ll need:
* Basin wrench
* Pipe wrench
* Plumber’s putty
* Teflon tape
* Channel-lock pliers
* Bucket
* Rags/towels
* Replacement drainpipe (if needed)
### Step 2: Turn Off the Water Supply
Turn off the water supply to the sink to prevent flooding. You’ll typically find shut-off valves under the sink. Turn both the hot and cold water valves clockwise until they are completely closed.
### Step 3: Disconnect the Drainpipe
Place a bucket under the drainpipe to catch any water that may be trapped inside. Use a basin wrench or channel-lock pliers to loosen the nuts connecting the drainpipe to the sink and the waste arm. Carefully disconnect the drainpipe and remove it from under the sink.
### Step 4: Inspect the Drainpipe
Inspect the drainpipe for any signs of corrosion, damage, or wear. If the pipe is corroded or damaged, replace it with a new one. If the pipe is in good condition, clean it thoroughly with soap and water.
### Step 5: Apply Plumber’s Putty and Teflon Tape
Apply a bead of plumber’s putty around the drain opening in the sink. This will create a watertight seal between the sink and the drainpipe. Wrap Teflon tape around the threads of the drainpipe connections. This will help to create a watertight seal and prevent leaks.
### Step 6: Reconnect the Drainpipe
Carefully reconnect the drainpipe to the sink and the waste arm. Tighten the nuts securely with a basin wrench or channel-lock pliers. Be careful not to overtighten the nuts, as this can damage the pipe.
### Step 7: Test for Leaks
Turn on the water supply to the sink and check for leaks. If you see any leaks, tighten the nuts further or reapply plumber’s putty and Teflon tape. Continue to check for leaks until the drainpipe is completely watertight.
## When to Call a Professional Plumber
While many kitchen sink plumbing repairs can be handled by homeowners, there are certain situations where it’s best to call a professional plumber. These include:
* **Major Leaks:** If you have a major leak that you can’t control, call a plumber immediately.
* **Complex Plumbing Systems:** If you have a complex plumbing system with multiple connections and appliances, it’s best to leave repairs to a professional.
* **No Experience:** If you have no experience with plumbing repairs, it’s best to call a plumber to avoid making mistakes.
* **Persistent Problems:** If you’ve tried to fix a problem yourself and it keeps coming back, it’s time to call a plumber.
## Preventing Future Kitchen Sink Plumbing Problems
Preventing future kitchen sink plumbing problems is essential for maintaining a healthy and functional kitchen. Here are some tips to help you prevent problems:
* **Avoid Pouring Grease Down the Drain:** Grease can solidify and clog the drainpipe. Dispose of grease in the trash instead.
* **Use a Basket Strainer:** A basket strainer will catch food particles and debris, preventing them from clogging the drain.
* **Flush the Drain with Hot Water:** Flushing the drain with hot water regularly will help to dissolve grease and prevent clogs.
* **Avoid Overloading the Garbage Disposal:** Overloading the garbage disposal can cause it to jam or break down.
* **Inspect Your Plumbing Regularly:** Inspect your plumbing regularly for any signs of leaks or damage.
By following these tips, you can help to prevent future kitchen sink plumbing problems and keep your kitchen running smoothly.
## Kitchen Sink Plumbing Repair: A Comprehensive Review
Kitchen sink plumbing repair is a vital aspect of home maintenance, but it can be daunting for many homeowners. To provide a balanced perspective, we’ve compiled a comprehensive review based on expert opinions and practical experience. This review is designed to help you make informed decisions about your kitchen sink plumbing needs.
### User Experience & Usability
From a user experience standpoint, kitchen sink plumbing repair can range from simple tasks like tightening a loose connection to more complex projects like replacing a drainpipe. The ease of use depends largely on the homeowner’s skill level and the availability of the right tools. Many find that following step-by-step guides and watching instructional videos can significantly improve their ability to tackle these repairs. However, without prior experience, even seemingly simple tasks can become frustrating and time-consuming.
### Performance & Effectiveness
In terms of performance, kitchen sink plumbing repairs can be highly effective in resolving issues like leaks, clogs, and garbage disposal problems. When done correctly, these repairs can restore the functionality of the sink and prevent further damage. However, the effectiveness of the repair depends on the quality of the materials used and the precision of the installation. For example, using high-quality plumber’s putty and Teflon tape can ensure a watertight seal and prevent future leaks.
### Pros:
1. **Cost Savings:** DIY kitchen sink plumbing repairs can save homeowners a significant amount of money compared to hiring a professional plumber.
2. **Convenience:** Homeowners can perform repairs at their own convenience, without having to schedule an appointment with a plumber.
3. **Increased Confidence:** Successfully completing a kitchen sink plumbing repair can boost a homeowner’s confidence and encourage them to tackle other DIY projects.
4. **Improved Home Maintenance:** Regular kitchen sink plumbing repairs can help homeowners maintain their homes and prevent more serious problems from developing.
5. **Enhanced Understanding:** By performing DIY repairs, homeowners can gain a better understanding of their plumbing systems and how they work.
### Cons/Limitations:
1. **Risk of Damage:** Improper repairs can cause further damage to the plumbing system, leading to more costly repairs.
2. **Time Commitment:** Kitchen sink plumbing repairs can be time-consuming, especially for homeowners with limited experience.
3. **Potential for Injury:** Homeowners can injure themselves while performing plumbing repairs, especially if they are not careful.
4. **Limited Expertise:** Homeowners may not have the expertise to diagnose and repair complex plumbing problems.
### Ideal User Profile
Kitchen sink plumbing repair is best suited for homeowners who are comfortable with DIY projects, have some basic plumbing knowledge, and are willing to invest the time and effort required to perform repairs correctly. It’s also ideal for homeowners who want to save money on plumbing costs and maintain their homes themselves.
### Key Alternatives
One alternative to DIY kitchen sink plumbing repair is to hire a professional plumber. This is a good option for homeowners who are not comfortable with DIY projects or who have complex plumbing problems. Another alternative is to purchase a plumbing repair service plan, which covers the cost of plumbing repairs for a set period of time. However, these plans can be expensive and may not cover all types of repairs.
### Expert Overall Verdict & Recommendation
Overall, kitchen sink plumbing repair is a valuable skill for homeowners to have. While it’s not for everyone, those who are willing to learn and invest the time can save a significant amount of money and maintain their homes effectively. If you’re considering DIY kitchen sink plumbing repair, start with simple projects and gradually work your way up to more complex repairs. Always prioritize safety and consult with a professional plumber if you’re unsure about anything.
## Insightful Q&A Section
Here are 10 insightful questions related to kitchen sink plumbing repair, along with expert answers:
1. **Q: What’s the best way to prevent clogs in my kitchen sink drain?**
**A:** The best way to prevent clogs is to avoid pouring grease down the drain, use a basket strainer to catch food particles, and flush the drain with hot water regularly. You can also use a mixture of baking soda and vinegar to dissolve grease and prevent clogs.
2. **Q: How often should I clean my kitchen sink drain?**
**A:** You should clean your kitchen sink drain at least once a month to prevent clogs and keep it running smoothly. You can use a mixture of baking soda and vinegar or a drain cleaner to clean the drain.
3. **Q: What are the signs that I need to replace my kitchen sink drainpipe?**
**A:** Signs that you need to replace your kitchen sink drainpipe include leaks, corrosion, and damage to the pipe. If you notice any of these signs, it’s best to replace the drainpipe as soon as possible to prevent further damage.
4. **Q: How do I know if my kitchen sink drain is properly vented?**
**A:** A properly vented kitchen sink drain will drain quickly and without gurgling noises. If your drain is slow or gurgling, it may not be properly vented. You can check the air admittance valve (AAV) to make sure it’s functioning properly.
5. **Q: What’s the difference between plumber’s putty and Teflon tape?**
**A:** Plumber’s putty is used to seal connections between the sink and the drainpipe, while Teflon tape is used to seal threaded connections. Plumber’s putty is a soft, pliable material, while Teflon tape is a thin, plastic tape.
6. **Q: How do I remove a stuck kitchen sink drain strainer?**
**A:** To remove a stuck kitchen sink drain strainer, you can try using a basin wrench to loosen the nut underneath the sink. If the nut is corroded, you may need to use a penetrating oil to loosen it. You can also try using a screwdriver and hammer to tap the strainer from the top.
7. **Q: What’s the best way to prevent garbage disposal odors?**
**A:** The best way to prevent garbage disposal odors is to grind citrus peels, ice cubes, or baking soda in the disposal regularly. You can also use a garbage disposal cleaner to remove food particles and odors.
8. **Q: How do I reset my garbage disposal if it’s not working?**
**A:** To reset your garbage disposal, turn off the power to the disposal and locate the reset button on the bottom of the disposal. Press the reset button to reset the disposal. If the disposal still doesn’t work, check for obstructions and remove them.
9. **Q: Can I use chemical drain cleaners to clear a clogged kitchen sink drain?**
**A:** While chemical drain cleaners can be effective in clearing clogged drains, they can also damage your plumbing system and pose a health risk. It’s best to avoid using chemical drain cleaners and instead try using a plunger, baking soda and vinegar, or a drain snake.
10. **Q: What are the common causes of low water pressure in my kitchen sink?**
**A:** Common causes of low water pressure in your kitchen sink include clogged aerators, closed shut-off valves, and problems with the main water supply. You can clean the aerators, open the shut-off valves, and check with your water company to see if there are any problems with the main water supply.
## Conclusion
Kitchen sink plumbing repair is a skill that can save homeowners time, money, and frustration. By understanding the basics of kitchen sink plumbing, identifying common problems, and following step-by-step repair instructions, you can tackle most kitchen sink plumbing repairs with confidence. Remember to prioritize safety, use the right tools, and consult with a professional plumber when needed. With the knowledge and skills gained from this guide, you’re well-equipped to maintain a functional and efficient kitchen sink, ensuring a smooth and hassle-free experience for years to come. Share your experiences with kitchen sink plumbing repair in the comments below. Explore our advanced guide to drain cleaning for more in-depth information. Contact our experts for a consultation on kitchen sink plumbing repair today!
